Considerations Before Opting for a Kitchen Island

large kitchen island with wine rack


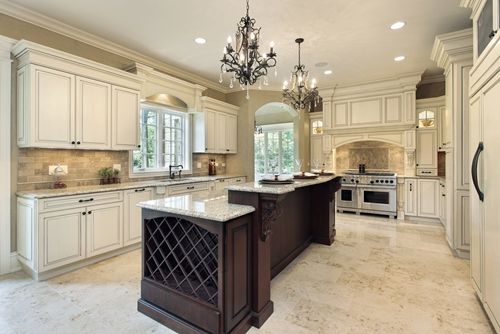
In your kitchen, much of the furniture, appliances and containers are located against the walls – the fridge, cabinets, stove and sink, to name a few. But there is only so much area that you can take advantage of this way. When trying to find extra space to keep your things functional and organized, turn your eyes to the centre of the room. Kitchen islands are an increasingly popular trend that give you more space to work with in terms of both surface area and storage options.

If you are looking to make a significant change to your kitchen that will increase the functionality of the space, an island may be the right decision.

The benefits of a kitchen island
Before you start a major renovation project, you need to weigh the advantages of the new addition to your kitchen against the cost required to install the fixture.

These benefits include:

  • Extra surface area: If you love to cook, an island will give you extra space for chopping vegetables, stirring batter and prepping all of your favourite recipes. .
  • More storage: The increased surface area is definitely a plus, but so is the space below the counter. The area beneath can be used for additional storage to help you organize your pots, pans and other necessities.
  • Additional sink: If you want an extra sink, an island is the perfect location. At your local Wolseley Canada Kitchen and Bath Classics showroom, you can look through a variety of sink and faucet options from trusted brands to outfit your new addition.
  • Increased entertaining: Do you love spending time with people? A kitchen island with barstools gives you another place where friends and family can gather to talk and create memories.
  • Improved home value: Even if you do not plan on staying in your current home indefinitely, an island may still be a good investment. This kitchen feature can increase the value and appeal of your home if you decide to sell.
If you have the space, a kitchen island can offer a number of benefits to your room. If you have the space, a kitchen island can offer a number of benefits to your room.

Considering your kitchen needs
Though the benefits of an island are numerous, it is not the right choice for every kitchen. Before you get started, you should think about your own kitchen needs and your existing parameters, including the amount of space you have to work with.

Before deciding to install a kitchen island, consider the following factors:

  • Existing space: Though an island is useful, it is not worth installing if it will make your kitchen too crowded to move. Make sure you have plenty of space and choose an island that is an appropriate size.
  • Kitchen habits: If you rarely use your kitchen, an island may not be worth the effort it will take to install.
  • Storage needs: Need more room to store your small appliances and other kitchen necessities? An island might be the way to go. Depending on the size of your island, you should be able to install several drawers or cabinets to increase organization.
  • Desired appliances: If you want a wine cooler or trash compactor, an island could provide an opportunity for these extras. Some even involve ovens or ranges, though the installation for these types is much more intensive.

Not sure if an island is the right choice for your kitchen? Visit a Kitchen and Bath Classics location today for some advice and suggestions on your home improvement project.

Does Your Bathroom Need a Double Sink?

double sinks for a master bathroom

Think about your morning routine. Do you struggle to elbow past your partner to brush your teeth? Or have trouble finding space for your hot curling iron on the countertop? If every morning is a struggle, the solution to these challenges and more could be a double sink. 

You do not need to knock down a wall to create more space in this high-use area. If you are designing a new bathroom or renovating an old room, a double sink may be smart choice for your home. 

Reasons to consider a double sink
Unless you live by yourself, you probably split a bathroom with a romantic partner or platonic roommate. And while they say that sharing is caring, at times it may be more beneficial for your morning routine to have your own spaces. 

If this sounds familiar, you are not alone. The most common reason to choose a double sink is that you need more space because you share the bathroom with another person. 

"Couples these days usually prefer the idea of two sinks for one simple reason," architect Thayer Hopkins told Houzz. "They lead busy lives and need access to the bathroom at the same time." 

However, simplifying your morning routine is not the only reason to choose a double sink. Another benefit of this optionis the increase of personal space. No more worrying about which tube of toothpaste is yours – just keep your possessions around your personal sink. 

You will also have more counter space, which can help if you use a straightening iron, curling iron or other tool in the morning that needs to rest on a flat surface. 

Finally, assuming you put in a double vanity as well, this strategy will increase your storage space. And who does not need more room for bathroom organization? 

A vanity with two sinks increases both counter space and storage in your bathroom.  A vanity with two sinks increases both counter space and storage in your bathroom.

Considerations for a single sink
A double sink is not for everyone. When making these bathroom layout decisions, one of the first things that you need to think about is space. Clearly, two sinks take up more room than one, so you need to make sure that this is a feasible option for your bathroom.

"If there isn't a solid 6 feet or more available for two sinks, I will counsel clients to stick with just one sink basin," Hopkins told Houzz. "These 6 feet or more will give the minimum 11- to 12-inch buffer needed between basins to keep a couple from banging elbows and crowding each other out." 

Keep in mind that just because you have the space does not mean that it is the right decision. Squeezing in an extra sink might make the room more crowded and give you less space to move around, which would actually make the resulting design less convenient when you get ready in the morning. 

Another downside to the double sink is the cost. Between the increased supplies, a larger vanity and more difficult piping and installation, you may spend significantly more than if you had chosen a single sink instead. So make sure that you are willing to invest in the project before you get started. 

Once you have decided on the right sink – or sinks – for your bathroom, give some thought to the faucets that you want to pair with the new design. At your local Wolseley Canada Kitchen & Bath Classics showroom, you can choose from a number of trusted brands, such as American Standard, DXV, and GROHE, to ensure you find the right sink and faucet solutions for your home.  

4 Ways to Use Tile in the Kitchen

Grey tiles

Tiles are one of the most diverse decorating tools in your home renovation repertoire. With a variety of shapes, textures and colours to choose from, this type of material can be made to mesh with most any style and theme of décor. As an added bonus, they make clean-up easier than ever. Just a sponge with a little soap and hot water will typically do the job.  

Tiles are not just for the bathroom – your kitchen is another room that can benefit from these small squares. If you are ready for a home renovation project, try one of these four ways to use tile in your kitchen: 

1. Floor
The floor is a fairly standard place to use tiles around the house. But that does not mean that you need to be traditional in choosing how to use them in the kitchen. Black and white tiles can give your room a modern flair, while playing around with multiple colours or different sizes is a creative way to add interest to the space. 

To tile your floor, you will need to start by applying a thin set to the surface and smoothing it over with a trowel. Carefully set the backer board down over the thin set and then screw the piece down. Repeat until the whole surface is covered. Add a coating of thin set to the top of the backer board and then begin laying down your tiles. Clean any excess thin set as you go before it dries. 

2. Countertop
The counters are an important part of any kitchen. After all, without that space, you would be hard-pressed to chop your produce or mix up some batter. Give your countertop an update with tiles in a neutral colour. 

While you can certainly hire someone to do this update, it is also possible to complete the project yourself. DIY Network recommended the following steps:

  1. Apply thin set to the plywood surface.
  2. Lay the backer board panels on the thin set.
  3. Screw the backer board into the plywood. 
  4. Join the field joints using alkali-resistant tape.
  5. Set the tiles on the counter with room for a grout joint and mark the lines with a pencil to determine how many pre-cut tiles you need.
  6. Wet the backer board and apply the thin set.
  7. Use a trowel to comb the thin set to ensure uniform spread.
  8. Begin placing the tiles and tap with a rubber mallet to secure in place.
  9. After placing all tiles, wipe off any excess thin set.
  10. Let dry for 24 hours before placing anything on the counter.
Tile can be used in a variety of ways to elevate the tone of your kitchen.  Tile can be used in a variety of ways to elevate the tone of your kitchen.

3. Backsplash
A less traditional – but increasingly common – option for using tiles in your kitchen is on the backsplash. A backsplash is a panel – usually comprised of tiles – placed on the area of the wall behind the stovetop just above the range. Creating this element prevents any splatters from staining the wall behind the stove.  

Though many backsplashes feature black and white combinations or other simple patterns, your design does not need to be uncomplicated. You can play around with dramatic colours, or even images, to create a focal point in your kitchen. 

4. Accent
Adding tiles to your kitchen does not need to be a huge project. If you are looking for a smaller project, consider using the tiles to accent your other décor. For example, you can hang a few large, decorative tiles on the wall or use them as ornamental trivets or coasters. 

To complement your tile project, consider updating your kitchen with a new faucet or sink. Visit your local Wolseley Canada Kitchen and Bath Classics to view a variety of options from some of the world's best brands. 

5 Tips for Creating a Professional Quality Kitchen

kitchen stove top


Your kitchen is one of the most functional rooms in your home. While it may sometimes serve as a place to gather and talk with loved ones, it is also the space where you prepare your meals and serve favourite recipes. Consequently, it should have a warm and friendly environment that still provides plenty of space to chop, dice and sauté.

Having an area that is easy to cook in is not just about space. You should also arrange your supplies and other essentials in a way that makes preparing food efficient and simple. If you want a kitchen that is both aesthetically pleasing and functional enough to cook like a pro, try out the following five steps:

1. Clear cooking surfaces
To create a kitchen that is as efficient as it is visually appealing, you first need to ensure that you have sufficient empty surfaces for cooking. Nothing will slow you down in your culinary efforts like a lack of space. While a decorative vase or bowl of fruit may look nice, it should not be on the counter if it affects your ability to work.

You should additionally keep any appliances that you do not use regularly stored in your cabinets. Items like blenders and food processors can take up a lot of space that could otherwise be used for cooking.

2. Keep ingredients handy
Organization is important for creating a functional kitchen. However, if your ingredients are stored in inconvenient places, gathering everything you need to cook may take longer than the actual cook time. Keep your jars of dried herbs and spices on an easily accessible spice rack and store your dry ingredients in a cabinet with enough space that you can easily see what is inside.

Austin Johnson, executive chef of The Krebs in Skaneateles, N.Y., told HouseLogic that he recommends what he calls a “kitchen work triangle.” Everything you need for cooking should stay within this space.

“You want everything near to hand so you’re not hopping around all over the place,” Johnson said.

When you cook, the organization of your kitchen can make or break your meal. When you cook, the organization of your kitchen can make or break your meal.

3. Hang pots and pans
No matter what you are cooking, you will probably need at least one pot or pan – maybe even several – to complete the dish. Consequently, you do not want to be digging through cabinets every time you need one of these essential tools. Hanging your pots and pans from a ceiling rack will help keep them within reach when you are working on your latest culinary endeavor.

4. Go for quality over quantity
Do you have a block full of knives? Or maybe multiple types of food processors? While it may be tempting to stock your kitchen with every gadget and tool, to make your room efficient, you should go for quality over quantity. Go through your cupboards and make sure that you are only keeping the items that you truly use to make sure that you have room to keep the necessities close at hand. Plus, clearing these things off your counters leaves more surface space for your cooking.

5. Choose the right faucet
The faucet at your sink is a small element that can have a significant impact on the ease of your culinary experience. After all, you use the water that flows through it not only in your cooking, but your cleanup as well. A pullout faucet, such as an option from Grohe, may be helpful when you need to clean your dishes after your meal is complete.

To find a faucet that is perfect for your kitchen – both in terms of functionality and aesthetic – visit your local Wolseley Canada Kitchen & Bath Classics Showroom today.

5 Faucet Styles to Try in Your Kitchen Today

hand under a faucet with running water

Your faucet does a lot more than simply transport water. It plays a key role in influencing both the efficiency and aesthetic tone of your kitchen. The wrong faucet can waste water and make dishwashing a nightmare, all while throwing off the look of your room. But luckily, rectifying this problem does not need to be difficult. Installing a new faucet is an easy – and economical – way to improve your home. 

If you are looking for a kitchen update, consider one of these five styles of faucet:

1. Water efficient faucet
According to McGill University, the average Canadian uses approximately 329 litres of water everyday at home. Installing water efficient fixtures is one way you can help to reduce this high usage in your own house. These faucets typically reduce the maximum flow rate, lowering the amount of water wasted.  And this strategy does not only help the environment –  it saves you money as well by reducing what you pay in your monthly water bill.  

2. Wall mount faucet
Though the vast number of faucets are made to be mounted on the counter behind the sink, that is not your only option. If you are looking for a chic way to make clean up around the sink simpler, try a wall mount option instead. This option is particularly popular paired with large, single basin farmhouse sinks to create a rustic look. 

A single handle faucet is a convenient option for a well-used kitchen. A single-handle faucet is a convenient option for a well-used kitchen.

3. Single-handle faucet
Sometimes when you are trying to work in the kitchen, your hands are pretty full. Whether you are washing a large pot or trying to rinse some spinach, it can be difficult to manage two handles when turning on and off the faucet. If you find yourself in this situation often, a single-handle faucet could be a smart option for your kitchen.  These models allow you to control both the temperature and flow of the water with a single lever, simplifying their use. 

Single-handle faucets also offers a sleek, modern look to your sink. At your local Wolseley Canada Kitchen & Bath Classics showroom, you can find a variety of options by Baril that might be the perfect choice for your kitchen.  

4. Faucet and soup dispenser duo
If you want to simplify your countertop, consider opting for a faucet with a matching soap dispenser. With both pieces mounted behind your sink, you will never again have to wonder where the soap went when you need it. 

5. Automatic smart faucet
These days, it seems that everything has gone hands-free. Your faucet is no exception. If you enjoy having the latest technology in your kitchen, an automatic smart faucet may be the choice for you. Just place your hand under the head and the water will turn on by itself.  

To view a variety of faucets and sinks to fit any space and style, visit your local Wolseley Canada Kitchen & Bath Classics Showroom today.   

What is your kitchen style?

kitchen designer standing next to a kitchen faucet

For many, the kitchen is the heart of the home. Yes, it is where you prepare your meals, but it is likely also the place that the kids tell you about their day and friends gather to chat over a glass of wine. There is simply something warm and inviting about a kitchen that draws people to it day after day, even when there is no cooking to be done. 

"The kitchen is truly the focus of the home today," New York-based interior designer Andrew Suvalsky told HGTV. "A great kitchen design will give essential clues to how the rest of the home can and should develop."

Whether you are a DIY-enthusiast or could not care less about curtains and countertops, the way that you arrange your kitchen says a lot about what you enjoy and how you should decorate spaces throughout your house. 

Modern simplicity
If clutter has you running for the hills, you probably love everything about the minimalist aesthetic. Keep the counters free of small appliances and kitchen tools by adding extra cabinets and other storage options where you can tuck everything away safely. Painting the cabinets and walls in a single shade will help further the simplistic look. Finish your modern, minimalist kitchen with sleek, chrome fixtures, like a single-handle faucet and a hanging pendant light. 

Keeping your kitchen organized can actually turn into part of your decorating aesthetic. Keeping your kitchen organized can actually turn into part of your decorating aesthetic.

Functional organization
Who needs pictures on the walls when you could use that space to hang your pans? If you are an enthusiastic chef who cares more about what is in the oven than what the oven itself looks like, your decorating theme is likely going to hinge on functionality. A hanging pot rack is the perfect focal point that will give you extra storage space while elevating the tone of the room. 

Transitionally trendy
If you find yourself combining both modern and classic elements in your kitchen design, you may be ahead of the game. This theme – formally known as "transitional" – is an increasingly popular kitchen option. A neutral colour pallet is a smart way to create a classic background that you can build on with less traditional accessories, like curtains in a quirky pattern or a unique backsplash. Transitional is a particularly good theme if you enjoy DIY crafts. Little touches like personalized wall décor or storage containers that you made yourself, fit in well with the look. 

Country farmhouse
You cannot beat the classics. If you love the country look, you are far from alone. Not only does this theme give your kitchen a warm and cozy feel, it is a great opportunity for a farmhouse kitchen sink, a style that offers extra space when it is time to wash dishes. Consider taking the doors off your cabinets for open shelving and throw a couple of rugs on the wood floor to complete the design. 

Rustic chic
If you would rather be up in the mountains than lounging on the beach, a rustic kitchen is probably just right for your aesthetic. Houzz recommends playing up brick, timber and stone to create this theme and match it with vintage appliances. If you have space for a fireplace, all the better. Red and black are good colour schemes for your rustic kitchen, particularly in a plaid pattern. 

Whatever kitchen style you prefer, your features are an important part of creating the right look. Visit a Wolseley Kitchen & Bath Classic showroom today to find the perfect faucet, lighting and other elements to complement your perfect kitchen.   

Clean your bathroom like a pro with these tips

cleaning bathroom toilet with a brush


Of all the household chores, there is one that tends to be the most dreaded: cleaning the bathroom. Even if you are the kind of person who loves a sparkling home, it is likely not an activity that you particularly enjoy. However, that bathroom is not going to clean itself, so unless you want to hire a professional, the task is going to fall to you.

Though cleaning the bathroom is never going to be fun, there are ways to make your job easier. To give your bathroom a professional-level deep clean, follow these simple steps:

Clean as you go
To keep this chore from becoming a time-consuming ordeal, your first step should be to develop the habit of cleaning as you go. And that does not just mean picking up your dirty socks off the floor. If you accidentally squirt some toothpaste on the sink or spill shampoo down the side of the tub, wipe it up right away. These messes will only solidify over time, making them harder to clean up later. Doing a little extra work each day will make your regular deep cleaning less time-consuming and intensive.

Start with the basics
Once you get out your supplies, start by sweeping or vacuuming up any hairs and other loose particles that may have gathered on the surfaces. It is better to do this before pulling out any of your cleaning sprays and other supplies, which can actually make it harder to lift dust and the like from the floor and counters. Once this step is complete, you can see what areas are going to need your attention for a little extra work.

When you spray cleaning product on your counter, let it sit for a few minutes before wiping it off.When you spray cleaning product on your counter, let it sit for a few minutes before wiping it off.

Heat it up
The surfaces are swept and dusted – now you can get down to the more difficult messes. Even if you try to be intentional about cleaning as you go, there will be times when grime builds up, particularly in your tub or shower. To make it easier to get rid of any buildup in these areas, Jenny Botero, resident manager of the Crystal Gateway Marriott, told HGTV that her team fills the tub with a couple inches of hot water and lets it sit for a few minutes before wiping down the surface to increase the effectiveness of alkaline cleaners. This hot water trick also works on tile floors and other similar areas, though you need to be sure that you do not leave any water behind when you are done cleaning.

Hot water can work wonders on some clogged drains as well. Pour boiling water down a sink or shower that is clogged and see if that does the trick before trying any harsher cleaning products.

Start spraying
When you spray a cleaning solution on your bathroom surfaces, what do you do next? If you wipe it away, you are making your work more difficult for yourself. Leaving the product on for a few minutes allows it to break down the residue that is collected on your counters and tub. To get a deep clean, spray the surfaces of your bathroom and leave for five minutes. When you return with a sponge or cloth and begin rubbing the areas, you will likely find that the residue comes off much easier.

Sometimes even deep cleaning is not enough to freshen up your bathroom. If your faucets or shower head are rusting or otherwise in disrepair, consider treating your bathroom to a new look from Wolseley Canada. Visit a Kitchen & Bath Classic showroom today to view our selection of bathroom fixtures from all of your favourite designers.

5 Ways to Make Your Kitchen More Unique

Kitchen blueprint with filled in stove area

Between checkered dish clothes and farmhouse-style sinks, kitchens have the tendency to share some common characteristics. It is not really surprising, since these rooms usually each have a refrigerator, dishwasher, range and other standard features. But sometimes, you do not want your home to look like every other one on the block, and that includes the space in which you cook. Luckily, there are simple ways to make your kitchen unique without breaking the bank. 

If you want to create a kitchen that stands apart from the crowd, consider one of these five strategies: 

1. Play up mirrors
Looking to add some wow factor to your kitchen? Think about putting up a few decorative mirrors. A set of three or four smaller framed options can create a sophisticated look that will also reflect the natural light that comes in through the windows. The result is an elevated tone that will make your kitchen a pleasure to cook in, any day of the week. 

As an added bonus, mirrors can make your room appear bigger. It is an easy way to open up the space without knocking down a wall. 

2. Add some colour
Sometimes all you need to add to get some extra character in a room is a pop of colour. While neutral tones are extremely popular for kitchens right now, some well-placed colour can add interesting contrast to the room, helping to set it apart from more traditional décor. 

Houzz recommends dressing up your kitchen cabinets with not just one fresh coat of bright paint, but many, to create a patchwork effect. The quirky look works well with a vintage theme, but can also fit in with a more modern aesthetic. The tone will be strongly influenced by the colours that you choose. 

Bright color on your cabinets - or other areas of your kitchen - can help give the room a unique look. Bright colour on your cabinets – or other areas of your kitchen – can help give the room a unique look.

3. Dress up your faucet 
When you think of conversation starters, your faucet may not be the first thing that comes to mind. But an interesting faucet at your sink can really influence the feel of your room and attract the attention of your guests. Gone are the days when you were stuck with whatever piece came with your house. Faucets come in all shapes, sizes and colours now, and you can find anything from extremely simple to intricately decorative options, and everything in between. To see a wide variety of choices, visit your local Kitchen & Bath Classics showroom where one of our sales associates will be happy to help you find the perfect unique faucet for your kitchen.  

4. Install glass doors
Glass doors are an up-and-coming trend that can take the most standard of kitchens from boring to interesting overnight. Plus, they are the perfect opportunity to show off your favourite mugs, dishware and other kitchen essentials that might otherwise be tucked away in storage except at mealtime. Better Homes & Gardens added that glass doors can give the impression of a decorative China cabinet, which will add extra visual appeal to your space. 

For a similar effect, consider taking off the doors altogether. Open shelving can create a unique ambience that, as an added bonus, will make your room appear larger. 

5. Play up your lighting 
If a single feature will attract attention in your kitchen, it will likely be your lighting. After all, the source of light in your room by definition is anything but subtle. Instead of standard overhead options, consider a statement piece, like a modern chandelier, that will add character to the space.   

How to frame a bathroom mirror

large bathroom mirror with frame

Whether you are brushing your teeth or fixing your hair, you probably find yourself frequently making use of one of these bathroom essentials: a mirror. No bathroom is complete without it, but sometimes we tend to skate by with whatever our home came with, even if it is just a plain reflective sheet stuck up on the wall. 

Tired of your boring mirror? Adding a new frame is easier than you think! Just follow these simple steps to create a fresh look in no time:

1. Choose a style
Before you start your project, it is important to give some thought to the style of mirror that you want to end up with. Are you looking for a more natural look? Raw wood with a stain may be the way to go. If you want something more sophisticated, many hardware stores sell finished trim that make framing easy.

2. Measure your mirror
Once you have decided on the material that you want for your frame, pull out a measuring tape and write down the length and width of the mirror. Take the numbers with you to the hardware store to make sure you buy the appropriate amount of materials.

Do not forget to measure that area between the edge of your mirror and the adjacent wall. If you only have five centimetres between the top of the glass and the ceiling, for instance, you should not plan to create a 10 centimetre frame.

A plain mirror without a frame can give your bathroom an unfinished look.  A plain mirror without a frame can leave your bathroom looking unfinished. 

3. Purchase your supplies
In addition to the materials for the frame itself, you will need a number of other supplies on hand to do the job well. The Home Depot blog suggested purchasing Liquid Nails adhesive to attach the frame to the wall, paintable caulking to fill the cracks and a level to make sure that you hang the frame evenly.  

4. Prepare the area
Now that you have all the supplies you will need for the project, prepare a work space in an area that has good ventilation. If you want to work outdoors, make sure that you will not be interrupted by rain or wind. Laying down paper wherever you choose will help protect your work surface.

5. Paint your trim
If you are starting with wood, you will need to paint your trim before it can be pieced together. Because the bathroom is such a humid area, Home Depot recommended priming both sides before you add any colour. After letting the back dry for at least a couple of hours, turn the pieces over and start on the top side.

6. Combine the frame
Depending on the size of your mirror, you may want to combine the entire frame or at least segments of it, before attaching it to the wall. After gluing the components together, HGTV recommended waiting 12 hours before moving on to installation of the frame. Use caulking to fill in any gaps. 

7. Install the frame
Once your frame has completely dried, it is time to put it up on the wall. You should start with the top piece. Apply adhesive to the wall and gently press the frame to the glue. To secure the piece in place while the adhesive dries, HGTV suggested using strips of clean-release tape.

8. Touch up as needed
Finally, apply touch-up paint over any caulking you used or in places that were scraped during the installation process. 

Once you have finished giving your mirror a fresh look, consider upgrading your sink fixtures to really elevate the style of your bathroom. Visit a Wolseley Canada showroom today to find the perfect choice for your room.  

6 Hot Bathroom Remodeling Trends

bathroom with freestanding tub and walk in shower

With spring underway, cleaning and remodeling efforts are in full swing. If you are looking for a little inspiration to get you going on a bathroom remodel, check out some of the latest and greatest trends in bathroom remodeling:

1. Mediterranean-Inspired Designs
According to DIY Network, the Old-World inspired designs of countries like Spain, Morocco and Portugal are more popular than ever. From hand-painted terra cotta to vivid mosaic tiles, arabesque patterns are all the rage. 

2. Touches of the Natural World 
Organic materials – from wood to seashells – are being paired with more traditional bathroom design materials like tile and stainless steel to create a unique, elegant aesthetic. While organic materials have always been difficult to integrate into bathrooms due to moisture concerns, innovations in finishing and design can better protect these features.

3. Floating Vanities
A trend that has been popular in Europe but hasn't yet fully taken root m across the pond, floating vanities offer a clean, seamless look and a sense of wide-open space. What's even better is the functional and flexible nature of these free-standing vanities: Since they jut out from the wall, they can be positioned at virtually any height, making layout planning much easier.

4. Smart Storage
Homeowners looking for practical, yet discrete, storage have a plethora of options these days. Specialized cabinets can now be designed to hold and organize anything from beauty products to washcloths to hair driers. DIY Network suggested trying open shelving for a chic, yet practical, storage solution. 

Clawfoot tubs are seeing a resurgence. Clawfoot tubs are seeing a resurgence.

5. Free-Standing Tubs
Britt+Co reported that there has been a resurgence of free-standing tubs of all shapes and sizes. While these stately fixtures do require abundant space and won't be right for every setting, the variety of different designs – from modern to vintage – means there is likely an option that will fit your decor.

6. Get Rid of Those Shower Curtains
Shower curtains have long reigned as the traditional choice, though they can be difficult to clean and often create a feeling of isolation from the rest of the room. With the advent and widespread utilization of no-threshold showers, bathrooms seem larger and are more accessible, especially for those with mobility issues.

Now that spring is in the air, why not venture into a Wolseley kitchen and bath showroom? One of our specialists would be happy to to help you choose a theme and fixtures that make the most of your unique space.